Monday, October 22, 2012

Pumpkins and Peacocks

Over the weekend Ryan and I hummed and haaed about what to do with the pumpkins this year.  In previous years we have carved our pumpkins. But this being the first year that Norah can participate in Halloween we wanted her to help out with the pumpkins.  Now giving Norah a knife to carve a pumpkin would probably end with childrens aid being called!  That wasn't an option. So I thought maybe we would carve something that she wanted and she could help us take the insides of the pumpkin out.  Then I remembered that this is MY daughter... Here is why that wouldn't work.  When Norah gets ONE speck of dirt on her hands she comes running and asks to wash her hands. If she gets a tiny dot of paint on her hands she immediately has to wash her hands.  She does not like being dirty and she certainly wouldn't like putting her hands inside a pumpkin where its all slimy!  I thought maybe we'd try it anyway but figured it would just end in a big melt down.  Next year we'll introduce her to the fun times of carving a pumpkin. This year I opted for painting a pumpkin!!  On Sunday I pulled out the paints, Norahs little pumpkin and some sponge brushes (so her hands don't get mess... god forbid her hands get dirty!!)


She had a blast painting her pumpkin yellow and purple (her requested colours!)

Then it was time to decorate the big pumpkin!!  I picked up these Mr. Potato Head like faces at Dollarama and asked Norah where each should go. There were 2 sets of faces so the pumpkin has 2 sides!

She had a LOT of fun with these!!  Great alternative to carving a pumpkin. I figure if the pumpkin lasts till Halloween we'll cut him open afterwards and roast some seeds.... we'll see.


For Halloween I am making Norah a peacock outfit.  I got some blue and green feather boas from Dollarama and sewed them onto a little tulle blue skirt we already had for Norah.  I made the back feathers a little bit longer for a 'tail'.  I wanted to see how it looked on Norah however she did NOT want to try it on for mommy. This was the result.... My Not so Happy Peacock.... (Yes I'm that mom whose child is screaming and instead of taking the skirt off I run and grab the camera.... )


I tried to snap a photo of the back before I took it off but Norah just wouldn't have anything to do with it. Lets hope I can get her to wear it for Halloween.... Don't worry I have backup wings if she refuses!

This is the back of the skirt lying on the ground... see how its a little bit longer! I didn't want it too long because I didn't want her to slip!

I have made her some brown leggings that she can wear with the skirt. She'll have a brown shirt on the top and on her hat I've attached a Peacock feather that we picked up at the High Park Zoo for her. Plus we have a mask that is on a stick that she can carry around with her!  If I ever get her in the costume I promise to take more pictures!!!

Monday, October 15, 2012

Norah's Quiet Book

This year I am ahead of the game for Christmas... OH MY GOODNESS I SAID IT!  Yes Christmas is fast approaching and normally at this point I wouldn't even have a list of gift to make/buy yet. However, I'm turning a new chapter called "Prepare Now and PAY LESS".  I'm doing Christmas on a budget this year... not for any particular reason but I realized Norah doesn't need a million toys that she will never play with just for the pure fact of giving her something at Christmas.  Instead we're making her some gifts and making gifts for friends and family (sorry guys you'll just have to wait till Christmas to find out what we're making you).  Moving onto one of Norah's Christmas gifts this year.  I'm sure everyone has seen the Felt Quiet Books all over Pinterest lately.  I love them and everytime I saw them I was like THATS AWESOME... but a lot of work. Well I decided I would tackle that project and I must say I'm having a BLAST!!!!!  I found a BUNCH of templates online and last night I started cutting out pieces.

First up I found this awesome dress up doll template over at http://Racheldenbow.blogspot.ca the template I used is here. I grabbed my felt and started cutting. This is what I ended up with! I still have to attach them to a page but its a good start!


Next up I wanted a Mr. Potato Head page.... I looked at a few templates online and didn't like them too much so decided to make my own... maybe I should have stuck to a template.... Oh well I like it! He still needs more options. I decided to make it a Mr instead of a Mrs. since I already had a dress up doll.


Next up I found this amazing template over at Serving Pink Lemonade They actually have a bunch of templates there... I may end up using more from that blog we shall see.  This page has removable flower petals with the numbers on them to teach kids the proper order of the numbers.  I used yellow puffy paint to paint the numbers on.

Thats all I have so far but tonight is another night of cutting!!! I think my next page is going to be animal oriented... I also want to make an alphabet page... stay tuned!

Friday, October 5, 2012

Happy Thanksgiving!!!

This post is going to be a smorgousborg (yes thats a word) of stuff so be prepared to be tossed and turned all over the place!!!  ITS A LONG WEEKEND!!! WOOO to the HOOO!!! I am in desperate need of a long weekend... this week has been EXHAUSTING!!! 

Since it is fall I decided to Fallify (once again a word) my house!!  Now in the old house I NEVER decorated the house based on the season except at Christmas and then it was a half assed attempt at 'decorating'.  Now with the new house and actually having space and a fireplace mantal I have decided to decorate the BISNAAAAAS (once again... well maybe that isn't actually a word... ) out of it!!  So not having much in the way of fall colours I ran to my favourite place in the world... DOLLARAMA!  Yes people I love the store to death! SO many things you can get for under $2!!  I picked up some fun fall branches and some other fun things for around the house.  I also picked up some small gourds that I had planned on spray painting but decided I loved the orange and yellows that they naturally were!  Here is my mantle (I have since added more gourds on the left of this but you get the gist)


I would also like to disclose the reason the books on the right side of the photo above are all over the place.... I came home one day to find ALL of our photo albums on the floor and the shelf on the floor too.  Apparently those shelves are only held in with the cheap crappy plastic tabs!!  SO when I loaded the shelf up with photo albums eventually the tabs gave way... we just haven't had a chance to get wood or metal tabs to hold the shelf up.


I picked up 3 of these bunches of branches at Dollarama, they are made out of wire and beads.  I originally had them shoved in the back of one of my plants on the mantle but found this awesome small orange vase that I have no idea where it came from. It was probably from some flowers we received at some point.  I had forgotten about it because it was so small it was hard to fit anything in but it was perfect for this!


Next up this lovely display was actually a gift last Christmas that has been sitting hidden on the mantle in the far corner since... Christmas! I pulled it out and spruced it up a bit!  Can you see the cute card in the background?  Thats Norahs bday card to me... its brown and orange... perfect colours!!!


That was it for the living room. But talking about fall... when I was painting our chairs I noticed this in our backyard!!  The mums that were planted in the planters on our back desk when we got the house have decided to bloom!!!! I'm hoping they will be in full bloom this weekend for Thanksgiving!!!


Speaking of Thanksgiving and fall! I made Apple Butter last weekend!!!!  I have no idea why I hadn't done it before... its SUPER EASY!!!!

You just peel/chop 10 lbs of apples and throw them in a slow cooker. You add a mixture of 3 cups of sugar, some cinnamon and ground gloves to the apples and stir it all together. THEN you leave it on low for 12 hours... I stirred mine periodically but pretty much just left it!!  I woke up in the morning to this (well I jarred them... but you get the point)


 mmmm Apple Butter!!!  Happy Thanksgiving everyone!!!!!!

Wednesday, October 3, 2012

Dining Room Chairs Revealed

Last March I started transforming my dining room rooms.  The first step was to reupholster the seat cushions as they didn't all match and needed some updating to say the least. This was what I started with.


You can go here to see how I recovered the chairs to make them look like this.

Then I stopped because I wasn't entirely sure which direction to take from there.  I knew the table needed to be refinished badly and at that point why not restain the chairs too. OR should I go in a totally different approach and paint them??  So for the spring/summer my dining room looked like this. (well lets be honest, it only looks like this when I am taking pictures... most of the time it is a disaster zone with projects piled high on the table)


Now to be completely clear, there was nothing wrong with that look! I liked it... didn't have any problem with it... but I didn't LOVE it.  Also the chairs had some well worn spots that started to bug me. SO I primed them (see here) and then I painted them!! I opted for a creamy white spray paint!  I used Rustoleums Ivory Bisque spray paint!  It was actually fairly easy!!  The first coat took the longest but I had all 7 chairs done in about 45 minutes.  Then after letting it dry for 24 hours I lightly sanded down any areas I wasn't thrilled with and did a second coat which only took about a half hour.  I LOVE the end result!

Here they are at the table. As you can see the table is full of 'stuff'!


I love the look of the white chairs with the stained table.  As you can see in this picture the table top is in rough shape and needs refinishing. 


I will eventually get to refinishing the table. I have finally decided I want to keep the table the same way, I don't want to paint it or stencil it (that was an option) because I'm afraid its going to be too busy in there.  Striped chairs with a stenciled table top is a bit much.  I also love the look right now so I just need to refinish the top of the table and I'll be plenty happy with it!! 


So you don't have to scroll to the top, notice how much brighter the white chairs make my dining room!!!

 
This room isn't complete by any means.  I have a future plan to make a built in cabinet on the right side where the dresser is currently.  There is more than enough space to do built in drawers/cupboards below and wine rack above with glasses etc.  But that is down the road.

Thursday, September 20, 2012

Birthday Paint Party

This week I turned 29... ahhhh last year in my 20's!!  Well I took my birthday off work and being ... well me.. I decided instead of sitting back and relaxing on my day off I would be productive.  I pulled out all 7 of our dining room chairs, yes we have an uneven number.  Our dining room set was my Grand Omas and it came with 4 chairs. We randomly found another 3 at a an antique store by our cottage for $25 each!!!  So now was have 7 chairs. As previously mentioned in this post I have been debating whether to paint or stain the chairs.  I finally decided I wanted to paint them and I have an awesome plan for the table, details on that at a later date!!  I pulled out all of the dining room chairs took off the seat cushions and gave them a thorough cleaning!


Then I pulled out a foam brush and the can of Zinsser primer and got to work priming these babies with the best primer out there!! I LOVE that I didn't have to sand them down!!! 


It took forever and I decided to paint them I will definitely be spray painting them!  But I'm sooo happy the priming is done.  At about a half hour a chair it took me about 4 hours to finish these!!


And that is how I spent my birthday, most people think I'm crazy but it was the BEST day! I LOVE projects!!!


Wednesday, September 12, 2012

The Behemoth

I know I have mentioned the massive tree that we have in our backyard.  But I can't remember if I have ever truly shown any pictures of it... well you are about to get more pictures than you probably need!!  When we moved in we knew the tree was overgrown and in desperate need of a 'hair cut'.  Ryan initially said he could trim the tree... I just laughed hysterically and said 'Yes Hunny'.... It wasn't until we hung Norah's swing from the lowest branch that Ryan quickly realized trimming this baby was not in his 'reach'.  Without further ado meet 'THE BAHEMOTH' as I like to refer to her (yes I consider my tree a female... a VERY LARGE luscious female). Just for reference... I couldn't get about 30% of the tree in the picture.... Because of the way our yard is there is no way of getting the entire tree in a picture!! Its that big!


So I picked up the phone in the spring and got 3 quotes for tree trimming services. The first quote shocked the crap out of me at a whopping $1600!!!! I just about died!!! Next in came a quote at... wait for it... $2300!!! FOR TREE TRIMMING!!! Ok I get that our tree is RIDICULOUSLY HUGE But really?????
At this point Ryan and I were trying to convince ourselves that the tree didn't need trimming and that it would be just fine... aka denial!!  Finally I came across a local tree company called Karmatree and figured it couldn't get any worse why not try for one more quote.  Their quote came in at $900! THAT I could deal with.  However, I wanted to make sure they weren't going to put spikes in my tree (like some companies do) which ruins the tree!!  Luckily they don't use spikes, they use suspension ropes and a big bucket truck. I was excited... well lets rephrase that.. I was not thrilled about forking over $900 for a 'hair cut' for The Behemoth... but I was excited that it wasn't $2300!!! 


THEN we forgot all about poor Behemoth.... it was summer and we were enjoying the fact that she kept our backyard cool and shady. 


Until last week when I realized fall was coming up and that meant Behemoth was about to shed her 'clothes'... Oh goodness... the thought of all those leaves makes me exhausted already!!!! 


So I picked up the phone and called Ryan over at Karmatree. They are honestly the nicest guys ever. They were at the house 4 days later trimming the tree. They did an amazing job of cleaning up every last branch they chopped off.  I came home from work to find that I could actually SEE my beautiful tree!!!  Here she is after her $900 hair cut!


Just so you don't have to scroll up and down, here is the before and after side by side.

I think I can safely say we will have about 30 less bags of leaves to rack up this fall!!! Our neighbours have always been telling us that we have a family of raccoons living in our tree, but we never saw them... until the tree was trimmed.  When I got home last Friday I was talking to Ryan of Karmatree and he pointed out our backyard pet who apparently had been sleeping on this branch the entire day while they were trimming the tree.  Brave little bugger! (if you can't spot him he's in the middle of the photo)


We are both so happy with our trimmed tree and can't thank Karmatrees enough!! They did an amazing job!! If you live in the Toronto area you can find them at karmatree.ca.

Disclaimer: We have not been paid by Karmatree these are 100% our opinions.

Friday, September 7, 2012

Don't Judge This House By Its Front Entrance


I know I have mentioned a few times that eventually Ryan and I want to build a super awesome front hall storage bench/closet.  But I have never actually shown our front hall in its current state.... SO let me do that first before I explain what my future plan is for our front entrance!  This is here what our front hall looks like 50% of the time.... the other 50% of the time there are shoes everywhere and coats hanging on the stair banister!


I LOVE the slate tiles in the front hall. And I LOVE the black front door, I think it looks amazing!!  I also LOVE the light fixture.  As you can see from the photo above the table my dad made us for the hall in the old house fits PERFECTLY next to the stairs and radiator in the hall and I love it there!  The problem we have is storage since there is no closet! So we have temporarily used what we had on hand.


That is an Ikea Aneboda Wardrobe that I have had since 2nd year university!!  I'm actually shocked it has lasted that long... we all know how well Ikea products last when moved a million times. That wardrobe has lived in 2 apartments, 2 storage units and 2 houses being moved a total of 7 times!!  In the last house we had it in the living room temporarily and it was moved to the basement for the majority of the time we lived there.  It works for now but it doesn't tie in with anything!!  Next to it we used the storage cabinet that we bought for the bathroom in the old house.  It moved from there to the bedroom in the old house for a little while and now it is in the front hall housing Norah shoes, my purses and random other things.  The baskets above the wardrobe have all our hats, mitts, scarves, umbrellas and other accessories.  Here is the other side of the front hall which I have actually hung art on.


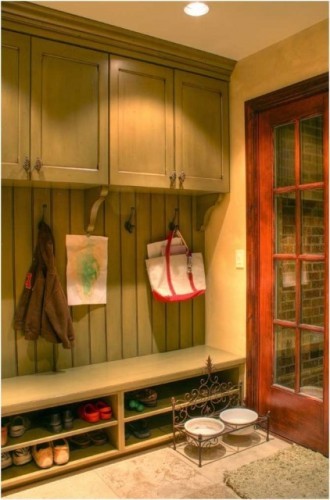
Now lets get to 'THE PLAN'.  To start off we have decided to go for a non-closet/closet.... We don't have the room for a proper closet so we will be using hooks.  This will also limit the number of jackets we can have at the front door which is JUST FINE WITH ME!! Means I can't buy 100 jackets and saves money :-) I do however want to have a side cubby with a small door to hide all those things you just don't know what to do with.  I LOVE this front hall idea!!

(source: http://www.houzz.com/photos/users/countrywillow)

However I would like cabinet doors hiding the cubbies above like this idea. And I also like the layout of the shoe storage here a little better.
(source: http://www.houzz.com/ideabooks/159902?d=0&w=48055)

Just to add more complexity to my project I really like the look of using an old door as the back piece for the front hall like these!!
(source: http://buildingblocksintupelo.wordpress.com/2008/11/24/love-these-doors/)

After looking at what we have lying around the house a few weeks ago Ryan and I discovered we may just have almost everything we need on hand to do this project!!!  This is what I'm thinking right now...mind you I haven't measured a thing yet so it may not work out as I have planned in my head!!  Ultimately we are going for the look in the first photo but with doors instead of beadboard for the backing and doors on the cabinets above. 

We have about 5 old doors of various sizes in the basement already we just have to pick 2 of them to use.  We also have some old kitchen cabinets in the basement that are being used as extra storage in the laundry room which we don't need down there. Those would work perfectly as the cubbies above for hats/mitts/bags etc.  One of the cabinets already has doors we would have to figure somethign out for the other cabinet.  For the bench we actually have an old piano bench that we have been holding onto. I think it would work perfectly as a bench and we could build some built in storage next to it to make it longer.  Once everything is built we can add trim to make it look like a complete built in!  I figure this is the perfect fall/winter project so don't expect any progress on this until then. But I'm excited!!  OH for colour I plan on painting it white and adding some fun splashes of colour maybe in material for a cushion for the bench or with fun handles/hooks!