Wednesday, June 20, 2012

Framing It Up

I have been switching up pictures and paintings in our living room ever since we moved into our house.  I try something out for a few weeks then hate it and move it around.  The problem I have is I have 3 walls in a box that are bare but when I put stuff on them they look cluttered. So I have been humming and haaaing about which wall to put things on.  Unfortuntately I don't have great photos of this zone but I'll do my best to describe it.  Below is my living room (from Christmas because apparently thats the last time I took a photo... I MAY need to update my archives a little!!!) The 3 walls I'm talking about are the wall on the left of the picture where the tv is hung. There is about a 5 to 6 foot section where there is nothing on the floor and nothing on the wall.... aka big bare spot that junk gets thrown. Then to the right of the photo is Norah's play area and we have the wall on the right and the wall next to the doorway.


These are the walls in Norah's play area.  This is where we made Norah's magnetic board way back when here. As you can see I had hung 5 small pictures on the one wall. But after it sitting like that forever it looked pathetic with 5 tiny photos in a big bare space.


After a lot of thought I decided I wanted to create a photo wall with different frames and sizes. Originally I planned on panting all of the frames white but after hanging the frames on the wall I decided I like the mismatched frames!  I pulled out a bunch of frames I had lying around and organized them in a pattern on the floor. Once I was happy with that I cut out paper in the same size as the frames and taped them to the wall in the same pattern. I didn't want to mess up and make a million holes in the wall!!  Then I just put a nail in the paper that was hanging to get everything at the right height and that was it!  Here is how it looks now!


After looking at it for a few days I have decided I need to move the top middle frame up a few inches... its a little too level with the frame on the left but I'll get to that eventually. And here you can see the entire corner.
The blankness of the other wall doesn't bug me because that is the magnetic wall and once Norah stops eating everything in sight her magnets will be hung from that wall. 

Now the next task is to find or make something to hang on the wall across from Norah's play area... But in the meantime we are happy with this. 

Tuesday, June 19, 2012

WAKE UP!

For those of you who don't know Ryan you don't know that on weekends he is up earlier than weekdays. Why you may ask??  I STILL HAVE NO IDEA!! He has no reason to be up!  Norah and I TRY to sleep in till a reasonable hour (aka 7am) But sometimes that just doesn't happen.  Ryan will TRY to be helpful by emptying the dishwasher or doing dishes or making us breakfast... however NONE of those tasks are appreciated at 5:30am!!!!  Mostly because none of those tasks are quiet!!!  This weekend Ryan hit a new time record for waking us up... mind you Norah and I were already up having breakfast but I did have to come out and remind Ryan that our neighbours were probably still sleeping!!  This is what I found Ryan doing at who knows what time in the morning (probably before half the world was awake!!). 


He did stop and continue later on at a more reasonable hour!!  You might be asking what he was doing?  We had cut down a few trees in the backyard that were growing MUCH to close to the house!  They were just lying at the back of the yard and we decided at first we wanted to make Norah a sand box.  But after thinking about it a lot and after reading this post over at Young House Love where they discovered play sand has a big fat warning on it that it may cause cancer etc. And seeing their pea gravel pit they made for their daughter. We came to a few conclusions:

* Norah hates putting her feet in the sand anywhere... why would a sand pit in our backyard be any different
* Norah's favourite activity (next to the swing) in the backyard is to pick up all the gravel around the deck and put it in buckets and then put it back where it goes
* Sand boxes = large cat litter box... even if you have a lid
* Sand boxes = raccoon litter box
* Pea gravel boxes are awesome!!

So with all of that we decided we would make Norah a pea gravel box out of the old tree logs.  The plan is to cut the logs into 6 foot lengths. We are going to notch out the logs so they sit nicely together and it will end up being a 5 foot by 5 foot box on the inside.  We borrowed my dads chainsaw and Ryan had a blast going to work on the logs!


After they were all cut he placed them in a box.  Now we just have to notch them out and attach them together. We plan on getting gardening material for the bottom to keep the rocks in the box. There won't be big gaps in the box when we finally notch the logs out but for now this is what it looks like.

Monday, June 18, 2012

Mini Me and Cabinet

I have had this mini play kitchen cabinet sitting in my basement since February. I had planned on fixing it up for Norah's birthday and just ran out of time, then it got lost in the basement!  I finally got around to it this weekend.  First off, this little cabinet was my grandma's! SO it's OLD (sorry Grandma... you aren't old, the cabinet just is!) It has been painted MANY different colours over the years.  My mom played with this and I remember playing with it when I was little. It has a lot of history... but it was REALLY starting to show.  I had originally just planned on sanding down the edges to give it a rustic look but the paint was just too glossy and yellowed that it looked in REALLY bad shape.


I decided to sand it down and paint it with a fresh coat of paint, then sand it down to antique it a bit. That may sound contradictory but believe me the yellowed colour of the paint was bad but I really liked the worn look of it!! 

Saturday I pulled it out of the basement and while I was attempting to sand it down Norah was having too much fun helping! (Yes her shorts are WAY too big.. sorry for the diaper shots!)


 Here she is inspecting it top to bottom!


She even helped me sand it down!! Momma couldn't be prouder of the mini version of me!


After sanding it and wiping it down I pulled out Benjamin Moore super pale blue paint (No idea what the colour is... this can of paint came with the house). Here is the best picture to show you just how yellowed the old paint had become with a fresh coat of paint on the doors. I taped off the Plexiglas on the doors to protect them from the paint.


It took me about a half hour and I had painted the entire cabinet.


Then I pulled out the leftover wallpaper from our headboard project (here) and the play kitchen (here) and decoupaged it to the back of the cabinet.  Once again I can't get this photo to turn.... anyone know how to fix that??  Anyway...


That is as far as I have gotten so far. I still want to sand the edges down to antique it as well as change up the knobs and possibly decoupage the back of the inside of the cabinet.  I haven't decided yet.  But for now its looking MUCH better!!


Wednesday, June 13, 2012

DIY Play Kitchen - Final Reveal!

Before we get to the final before and after pictures I thought I would explain how I attached the P-Trap that we used as the faucet.  I had no idea how to do it and Ryan came up with a brilliant idea!!  Using the drill and the bit that you use typically to cut out a hole for a door knob (yes my technicality is out the window right now... I have NO IDEA what that this is called... sorry!!) we cut a round piece of wood the same size as the opening at the bottom of the P-Trap.  Then I sanded it down so it would fit perfectly. We glued it and screwed it into place.  Then I put glue on the inside of the P-Trap and hammered it on over top of the wood circle, and we had a 'working' faucet!!  Here is a picture of the wood circle screwed to the top of the oven.


As for the back splash, we pre-drilled holes in the back of the back splash and the back of the oven and screwed it in place. We pre-drilled the holes so we wouldn't split the wood. 

Now for the before and afters!  Here is the nightstand before its magical transformation!


And here it is after!!!


A better look at the top of it.

The sink.

The magnetic back splash

Here I put a Star Wars magnet on to show that it truly is magnetic!


The towel rack on the one side

The chalkboard on the other side


And one more finished picture!


Now lets talk price.  Here is the cost breakdown:
Nightstand - Free
Decorative Knobs - $5.65 (4 at $1.25 plus tax) - Warehouse Sale
Burners - $2.26 (2 at $2 plus tax) - Dollarama
Sink - $1.70 - Dollarama
Faucet - $3.39 - Home Depot
Dowel for oven rack - $10.17 (2 at $4.50 plus tax)
Quarter Round for Oven Window - $5.65
Screen for Front - Free (already owned)
Towel Rack - $1.41
Spray Paint (black/green) - $6.38
Magnetic Paint - Free (already owned)
Wallpaper - Free (already owned)
Decoupage - $5.65
Back splash Wood - Free (already owned)
Chalk Cloth - Free (already owned)

That makes a total of $42.62... Not too bad!!! 

I am delivering this tonight and I hope she loves it!!  I know Norah loves it... she hasn't stopped turning the knobs over the past couple of days!!!

To see the progress of this kitchen go here, here, here and here.

Monday, June 11, 2012

DIY Play Kitchen Part 3 - OH the frustration

Before I get into the big OMG WHY DID THAT HAPPPEN moment of working on the kitchen this weekend I will go through all the things that went right with the kitchen!!  First off the back splash!!  I wanted it to be magnetic because what kid wouldn't want to hang things on their super cool magnetic back splash!  I also didn't want to have to go buy a big piece of wood, so I called up my dad and he had some leftover 'wood' in the garage. I say 'wood' because its actually a composite so its basically plastic, but you would NEVER know!! It also has a super cool grainy texture to it.  It was perfect!! 


Next I pulled out my Rustoleum magnetic paint (previously used here for Norah's magnetic board) and painted 4 coats of this stuff on it. I love this paint because it only takes about a half hour to dry between coats!!  I knew I wanted to do something fun for the back splash, I went back and forth between a fun flowery stencil or swirls etc. But with the flowery wallpaper on the front of the oven I didn't want too much more pattern.  Then I remembered the awesome green spray paint I had used for the pots at the front of our house ( here).  The paint would go perfectly with the bright green oven knobs!! SO I opted for a non-traditional traditional tiled look.  I say traditional because it looks like tiles... I say non-traditional because lets be honest where do you find lime green tiles!!! If someone knows please tell me because that would be AMAZING!!!!  I taped off my 'tiles' using scotch tape (what I had on hand). 
 And pulled out my bright green paint and sprayed the 'backsplash' down.  I purposely went for a blotchy look to create more texture. I only did one coat of the green.  Then I pulled out my black spray paint and standing far away did a few sprays of that as well to add black specks to the 'tiles'

I had some help with this too... Norah kept running away with the can of spray paint..... she laughed every time she did it!!


After it dried I was left with this... its a LOT more green than this picture shoes... I had issues with lighting. I planned on taking another picture and forgot so you'll just have to trust me that its GREEN!!  Oh and if you're wondering why I didn't finish the 'tiled' look all the way down the board its because that's the bottom of the board and it will be hidden behind the oven so I didn't bother continuing the pattern. Now I MAY lightly spray this with white just to tone down the SCREAMING green but I haven't decided yet... I'll make up my mind tonight.


Next up we made an 'oven rack' using 3/8 inch doweling and leftover pieces of the 'wood' used for the back splash.  We drilled out holes in the side pieces and glued the dowel into place with a glue gun.  Then spray painted it black. (Yes that's me spray painting in my jeans... not smart but I didn't want to have to change)

And using small L brackets we secured the rack in place.  Doesn't it look awesome!!! (once again my foot has made an appearance...)

Then to add some FUN to the side of the oven I used some chalk cloth (amazing product!!) and glued it to the side of the oven and added some pale green ribbon as trim for it.  This is the chalk board where recipes etc can be written and it wipes clean easily!!


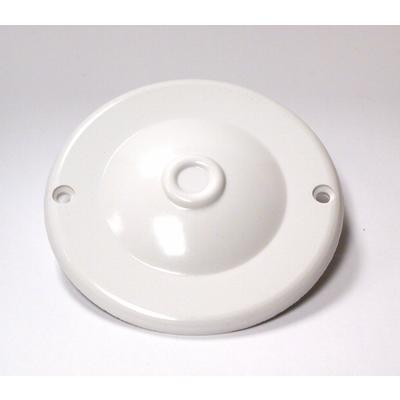
NOW here is where my frustration began on Sunday.  Ryan and I went to Lowes to price out a fence for our backyard and stumbled upon something similar to this below.  Its a plate that covers ceiling electrical boxes.  It was the PERFECT size to put on top of the trivets so we could create/attach oven burners. I planned on covering it in a fun black and silver material I have and thought it would look amazing!! 


WELL All was well until I tried to screw the sucker in place.  We had no issues screwing the oven rack in place BUT apparently the top of the nightstand is made of crap!  The screws went in and came right back out!! They wouldn't stay in place at all!!!  After I did the first one I screamed because it chewed up the beautiful top of the nightstand and I had gone backwards about 10 steps in completing this kitchen!  Ryan came in and told me I must have over torqued the screw, so he grabbed a screw and did the same thing I had just done... so now we had 2 holes!! So we grabbed larger screws thinking that was the issue... NOPE!! The top of this was just NOT meant to have screws in it... Sorry for the lack of pictures here... I was freaking out and forgot to take pictures. Other than this photo of the large holes we created!!

Needless to say me and the kitchen took a little time out as I contemplated the next step in fixing it.  Ryan's solution was to get bolts and screw it all the way through but then I would still have to use wood filler and paint to cover the large holes.  I finally decided to scrap the whole screwing it in process and returned the ceiling cover plates to Lowes.  To cover the big gaping holes I grabbed the scraps of leftover wallpaper and cut out circles with my pinking sheers and glued them on.  NO MORE HOLES!! You can't even tell I made a big mistake... but because I like to tell it as it was I had to show the holes!.  Then using the craziest glue ever, E6000, which I use to glue homemade cuff links for Ryan, I glued the trivets on top of the circles.  I forgot to take a picture of that but will add it to the final post this week.  It looks awesome!!!  I think it actually looks better than it would have with the cover plates!!

Now this is being delivered this Wednesday and its SOOOO close to being completed! All we have left is to screw the back splash in place, attach the faucet and screw the knobs in and shorten the bolts that they are on.  THEN its complete! SO come back later this week to see the end result!!!

Wednesday, June 6, 2012

DIY Play Kitchen Part 2

Despite a VERY sick little girl Ryan and I made some progress on the play kitchen.  It is getting SO much closer to being finished!! When I left it last it looked like this (go here to see how we did that)

Next I primed it with two coats.  Then I pulled out left over wallpaper from our DIY headboard project.  I wet it as directed and stuck it on the front of the oven door and drawer and waited patiently (well maybe not patiently... but waited none the less).  After it dried I used Decou-page (Mod Podge works too I just had a jar of decou-page on hand) and went over the wallpaper and the edges to stick it down.  Now here is where I ran into a problem... wallpaper glue isn't meant to stick when the wallpaper is drenched with more glue! So my wallpaper started peeling off.  Next time I won't use the glue from the prepasted wallpaper.  So where it was coming up I just put some Decou-page on it and stuck it back down. No problem at all just an extra step that I hadn't planned on taking.  So far I have done about 3 top coats of the decou-page loading up the edges as I don't want it to peel off!!! 

Next I pulled out a leftover can of super pale blue high gloss paint (need to be able to wash this if it gets goo on it!!) I painted 2 coats of the paint, you can only tell its blue if you put white next to it. I didn't want to do white and I found this can of paint and knew it would be perfect!!! Then Ryan pulled out some trim that I had picked up at Home Depot and measured and cut the trim for the oven 'window'.  Using glue and a staple gun we attached it along with some mesh screen.  I'm SO pleased with the result so far!!! 


Now onto the 'fun' stuff (mind you the power tool part was LOADS of fun!!) the accessories!!  I picked up a metal bowl at Dollarama a few weeks ago which we used to measure for the sink hole.  I also got some metal trivets (hot pads) from Dollarama that work PERFECTLY for burners!! Only problem we have is figuring out how to attach them.... I have a plan and will update whether it works or not...  Next the knobs on the oven, I picked up these awesome knobs from a warehouse sale and knew they would be PERFECT for this!!  They look like these from Amazon.com but I'm using lime green ones, a red one and a grey/blue one.

We put 2 lime green and white polka dot knobs on the one side for the 2 burners.  And for the sink we used a red with white polka dot knob for the hot tap and a grey/blue with white polka dots for the cold tap!!!  Ryan came up with that idea and I thought it was cute so we went with it!  Then the tap itself I was having a hard time finding something for it. But then I read this over at E-Z Does It and how they had used a P-Trap for the tap for their daughters play kitchen.  I thought hmmm lets go check it out, worst case if it was too big I'd return it! Luckily it looks great!!!  So here is the top of the kitchen as it stands right now!


Now here is the list of what we have left to do.
* Make oven rack for inside the oven using wood and dowelling and paint black
* Actually install knobs (need to cut down the screw so the drawer will still open) and YES they will turn!!
* Get/make wooden round discs, paint them black and screw them in oven top of oven burners to hold trivets in place
* Using wood, glue and screws attach the p-trap tap
* Make/Install the back splash using wood
* Paint the back splash with magnetic paint (at least 4 coats)
* Paint over the back splash with a fun design - still haven't decided what I'm going to do here...
* Install towel hook on the side of the kitchen
* Glue chalk cloth (chalk board) to the other side of the kitchen
* Install push light inside oven
* Install trim on inside of oven window to cover staples

We are getting there!! The biggest tasks left are the oven rack and the back splash and those shouldn't take too long!