Wednesday, December 29, 2010

Transforming the Dungeon

Our basement has undergone a few minor transformations since we have lived here but it still felt like a dungeon to me! Probably because we have only ever used it for storage! BUT with the baby on the way we wanted to make it a second living room so we would have a place for all of her toys in the future.
This is what the basement looked like when we first bought the house... it literally was a dungeon! Gotta love the astro turf carpeting and blacked out window!!


The first part of our transformation was done 3 years ago where we painted the wood panelling a nice cream and ripped up the astro turf and put small blue area rugs on the floor for the mean time. This worked for a bit but then as the renovations upstairs continued and the furniture was collected we slowly had WAY too much furniture and it somehow all ended up in the basement!!


Then after accumulating some couches and too much furniture I stupidly let Ryan do what he wanted in the basement... which transformed the basement into a disaster as he hung ALL of his framed photos on the wall (in no particular order...) We also have one too many couches down there but the one in the picture below will be gone soon enough and I plan that space to be play area for the baby. We will have a play kitchen set there that was mine when I was kid!
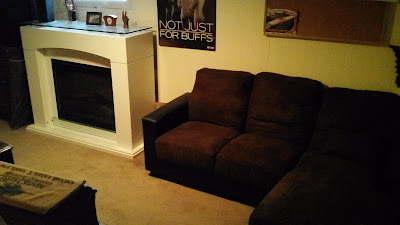
This is our new fireplace that I mentioned before! And do you see the new carpeting? My parents ripped up the carpet in their house that was still in good condition and we took it. It is NOT installed yet.. just laid down so we could keep our toes warm. We didn't want to install it while we were doing the basement bathroom!
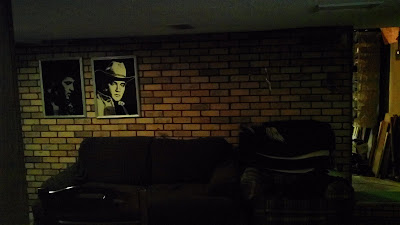
This is the other side of the basement... gotta love that fake brick wall. Originally we never painted it... I have no idea why... I think I thought you couldn't paint it. Not sure what my reasoning was but the new plan was to paint it and make it brighter. (Notice the 2 random placements on the Elvis pictures on the wall... yes that was Ryan!! )
To the right is the laundry area and to the left is the rest of the basement and the door to the basement bathroom.
This is the rest of our basement, as you can see more fake brick! And our wood burning stove which is currently disconnected because the pipe disintegrated!! AHHH.
This is the stained glass window that came with the house... somehow the wood panelling around the stained glass never was painted... I wasn't supervising the painting process!!!
Now while most people who get a week off decide to relax all week... I on the other hand decided it was the perfect opportunity to paint the fake brick wall!!! I pulled out my primer and took a stab at the brick wall behind the couch. This was halfway through the first coat of primer, I still had to get in the cracks with a brush. Even with just primer it looks SOOO much better!!!!
By the time I finished priming one coat of paint on the brick wall I was pretty exhausted BUT I had a little bit of paint left in my tray so I decided to prime the wood paneling around the stained glass. Doesn't it look SO MUCH BETTER already! It brightens it all up!!!

Now that was just the first coat of primer... it takes a lot longer to paint things when you are pregnant... OH and yes I know they say you shouldn't paint when pregnant... but honestly I don't care. I wasn't down there long enough to inhale a bunch of the fumes. The plan today is to hopefully do the second coat of primer and then a coat of paint!! We'll see.. its possible if Ryan helps out! Plus we still have the brick wall behind the fireplace that needs painting... I didn't have the energy to get to it yesterday!

Wednesday, December 22, 2010

MERRY TILING!

WE HAVE TILING PROGRESS!! Can you tell I'm excited!!! WAY back in March this was what our bathroom looked like. Basically it was a big muddy hole...
Now by no means are we done yet, BUT we're getting closer and it actually looks like something!!! Ryan's brother Calvin has been staying with us and working on the tiling for us and it looks FABULOUS!!! He's doing such a great job! I love coming home from work to see the progress, its just so fascinating! Yesterday the shower was being worked on.


This is inside the shower, the back wall and the right side are mostly done. One the right there will be a built in shelf that still needs to be tiled. The left side and front also need to be tiled still, but that's today's task!

Here is the shower! There was a little bit of an oops with the shower floor BUT I DON'T CARE its a shower!!! The floor is supposed to slope towards the drain and we got a little bit too much slope when doing the dry pack.... but no big deal! I'm totally fine with it!


Here is Ryan standing in the shower last night, he is so excited about the progress!!! He is like a little boy with his candy!


There are a lot of edges etc left to tile plus we have a white tile that is going to go above the cream tile in the toilet and sink area of the bathroom. Those will take awhile because there are lots of cuts to make. But its coming along fabulously!!!! Its slowly starting to actually look like a bathroom, I can't wait to use that heated flooring!!!!! The new timeline (since we were delayed in December because we were just so busy we didn't have time to work on it) is to have it completely finished hopefully over the holidays since Ryan and I are both off work! SO here's hoping that come the new year we will have a new finished bathroom!!!! Once the tiling is done there is the grouting to do, we also have to finish the taping of the drywall. Then we will paint the wall above the tiles and the ceiling, install the fixtures and add accessories and it will be complete!!!!

Thursday, December 16, 2010

Hot Hot Feet

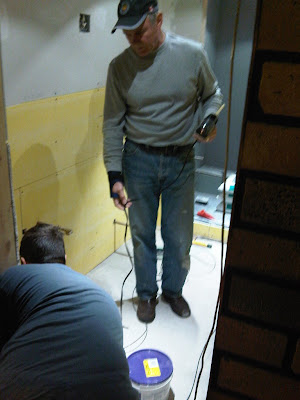
Last weekend my dad came over to help Ryan install the heated flooring. There was a little bit of math involved in laying the flooring and seeing as my dad is a walking calculator we knew it would take less time if he helped out! Plus it gave my mom and I time to do the radiator box.

Now the lesson that Ryan learned while gluing the heated flooring down is LISTEN TO YOU WIFE! I told him he would have to completely wash the concrete floor and get ALL of the dust and dirt up first or the glue wouldn't stick. Ryan told me he didn't have to wash the floor that he had swept it 3 times and vacuumed and that would be enough... so I bit my tongue and waited to say 'I told you so.' Well about an hour in my dad and Ryan came upstairs saying there were off to get more glue sticks because.. wait for it... THE GLUE WASN'T STICKING! YEP I called it!!! I believe I received a 'Ya ya you were right' from Ryan when I said I TOLD YOU SO with a big grin on my face!


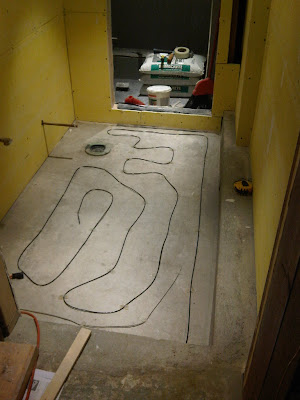
But after a lot of glue this is what the laid heated flooring looked like! We only bought a small amount because you can't cut or cross the wires when laying it so we didn't want to have too much. This should work just fine. Can you tell they made a blob around where the toilet will go, no point in having heating under the toilet but you definitely want it close so your feet stay hot hot hot!

Then on Sunday Ryan and Dave got the self leveling cement and poured it over top of the heated flooring in a thin layer.

This week Ryan's brother Calvin is over helping out with the tiling. So yesterday he laid the dry pack in the base of the shower and tiled the floor in the bathroom!!! It was SO exciting to come home from work to find this!
And a little bit later I went downstairs to find this loveliness of a floor!!! Doesn't it look amazing!!!! Three cheers for Calvin and his super amazing tiling work! And of course my hubby for helping out too with the tiles.

The plan today, if everything goes well was to tile the walls. I'm hoping everything went well and when I go home I will have some pretty tiled walls!!! OH its all coming together so nicely!!! I love the colour of the tiles! Since the bathroom has no windows we wanted to keep it light and airy!

Sunday, December 12, 2010

THE BIG NURSERY REVEAL!

On Saturday my parents came over to help us out with a few house projects. Ryan and my dad worked on the heated flooring in the basement bathroom while my mom and I worked on the dreaded radiator box. Now the radiator box was built we just needed to drill a million holes in the extra piece of board we had left over from the first radiator box we had made. (If you don't remember that fiasco check it out here)


Now I will spare you all the details, my mom and I stood outside in the cold (luckily it wasn't too cold) for a good hour drilling holes in the board! BUT in the end it looks great and we didn't have to spend anymore money.


Here it is almost done. Ignore the one big hole in it. Ryan's original plan was to drill less larger holes. But I was afraid our keys and other items would end up being pushed through the large holes and since the box is secured to the wall they would be lost forever. SO I still have to cover that one hole up... but that's a small fix.


Here is the finish radiator box! I love the randomness of the holes!


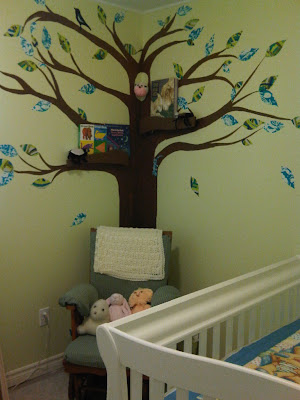
And with that finished the nursery is now complete!!! Here is my favourite part of the entire room!!! To see how this was made go here and here. And for the tree shelves you can go here.


Look we finally put an owl in the tree. My sister in law made this little owl for our baby shower, in fact there are another 4 of these throughout the room. To secure it we just put a nail in the wall and since the owl is made out of styrofoam the nail is right in its butt... sorry little owl!


Here is the crib with the quilt that was the inspiration for the room.
The crib skirt that I made (this is an old picture). You can see how I made that here.


And this is the quilt that my Oma made for us. Its all hand stitched! I LOVE IT!!!


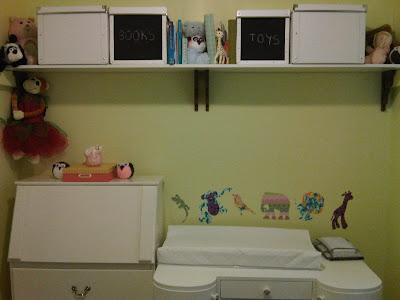
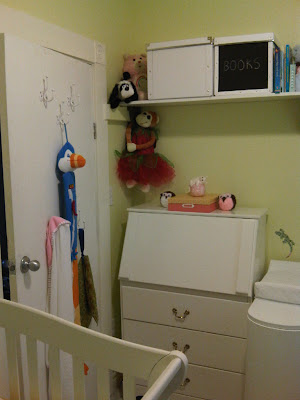
This is the other side of the room. With the dresser, change table and shelf. You can see all the details that went into these here, here, here, here and here.


Can you see the monkey hanging in the corner from the shelf? I put a super cute strawberry fairy outfit on her, I can't wait until the blueberry is big enough to fit into it! haahaa I'm going to be a funny mom who tortures her daughter in funny outfits!!! haahaa


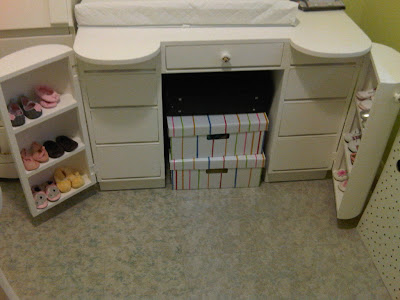
And the change table, with her shoes for the first month or so.... yes she has a lot of shoes. The boxes under the change table are full of more clothes and shoes and blankets as I ran out of storage space!!!


Its all ready to go, now just 9 weeks (or sooner) until our daughter can enjoy this room as well! I am SO happy with how this room turned out.


Now I haven't been keeping track of costs but I can estimate it.

* Change table - already owned, gave it a coat of paint (already had on hand)

* Dresser - already owned

* Crib - gift from my parents

* Wall Paint and primer (CIL paint) - $40

* Tree Paint (CIL paint, small can) - $15

* Material for Wall Decals (leaves, animals) $10

* Rocking Chair - $30

* Material and foam to recover rocking chair - $20

* Shelf - $10

* Decorative Shelf Stands - Free from my brother and sister in law

* Curtain - $20

* Boxes on shelves and under dresser - $45

* Crib Skirt material - $10

For a grand total of $200!! Not too bad at all!!! Thank you to my parents for the crib and to everyone who helped out with the room! Its very appreciated!!! Now we just wait to see what the blueberry thinks of her super awesome room!!

Tuesday, December 7, 2010

DIY Christmas Ornament and Update on Projects

First I'd like to apologize for my serious slacking lately! For the past 2-3 weeks I've been EXHAUSTED and all I want to do is sleep when I have a spare moment, its all part of being pregnant. Plus we've been super busy on the weekends so it has lead to no progress on the projects that we are trying to finish up!!! Hopefully this weekend we will have time to finish up the small things in the basement bathroom so that the tiling guy can come out next week and get that finished up for us. If I didn't mention it before we have opted not to do the tiling ourselves... if we were just tiling a floor we may have taken on the project ourselves. BUT since neither one of us has tiled before we thought it best not to tackle a shower/ceiling/walls and floor tile job! AHH A neighbour down the street is out of work and guess what he tiles!! So we are going to hire him to do it because we know he will get it done quickly AND if something goes wrong we know where he lives.. MUAHAHAHAHAHHAHAHAAHAA (evil laugh) HAHAHAHAH ok now I'm laughing!! Anyway so we're hoping we can get him out next week because then we can hopefully get the basement back in some order before Christmas. We have come to accept that the basement bathroom will not be finished before Christmas as we are booked up on weekends until then. But that's ok with me. I would like the basement in some order though before then. Once the tiling is done the rest of the work is not as messy!


ANYWAY speaking of Christmas (I still have to decorate the inside of the house... BUT I'm not doing that until the mess in the basement is cleaned up!)! I came across this super cute DIY ornament from How About Orange today that I am totally going to test out when I go home tonight so stay tuned for an update!!!

I think this would look super cute hanging on the tree or just around the house in general! Don't think of me as cheap if you get a bunch of these for Christmas... hahahahahhaha!!!!!

Thursday, November 25, 2010

Window Treatment

Last weekend I pulled out my trusty hem tape and the material I bought soooo long ago for the curtains in the kitchen and set to work making a valance for the window in the kitchen. Remember this poor lonely window that looks out on the backyard?


Well it was look a little bit pathetic and left out of the new kitchen reno so I decided it was time to make something pretty to spice it up. I had just bought a new roll of hem tape and had picked up a different brand thinking meh they are all the same. BIG mistake!!!! Apparently the brand I picked up this time (from Walmart) only works with the iron set to SUPER STEAMY. Alas my iron is old and does not cooperate very well on steam... in fact the water boils inside and then starts to bubble out of the steam holes getting the material and everything around wet! VERY annoying!!! BUT I was being stubborn and determined to get this curtain done so I worked around my irons inabilities. And within an hour I had this lovely little valance hanging in the window. I opted for a super short valance because now I have JUST enough fabric left over to make long curtains for the big window in the kitchen!

Isn't it cute!!

I'm off work tomorrow which is VERY exciting for me because I've had a crazy exhausting week and I plan on getting a bunch of Christmas crafts out of the way tomorrow!! I may even share a few with you next week. This weekend = installing heated flooring in the basement bathroom and dry packing the shower floor and possibly taping and mudding the drywall... Not sure how much we'll get accomplished this weekend.

Monday, November 22, 2010

Keeping Warm

Last week my company had a warehouse sale where we sold a bunch of the furniture from our model suites and all of the proceeds were donated to charity. Now the furniture we use to furnish our model suites is top of the line stuff and it was being sold (for the most part) at ridiculously low prices. I went and took a peak on Thursday not expecting to find anything... overall on Thursday when I left I was slightly disappointed... mind you we really don't need ANYTHING for our tiny house... we need to get rid of a bunch of things (anyone want some dressers???). ANYWAY, that night my sister in law called me asking if they had any electric fireplaces at the sale. And I thought about it and realized there had been 3 of the same type of fireplace and I had looked at it but couldn't see a price tag and had just assumed it was well out of my price range for something that I didn't REALLY need. They asked me to go back Friday and check it out for them. SO I went back on Friday and was SHOCKED at the price tag!!! 2 of the 3 fireplaces were already taken and there were plenty of people interested in the 3rd one. As I waited for a call back from my sister in law I made a spur of the moment decision and bought it anyway thinking if they didn't end up wanting it I would 100% be able to use it in our basement to heat things up down there (its not insulated and has no radiators... which = COLD). Yes eventually we would like to insulate the basement BUT that means MORE renos and there is only so much we can do before the baby comes. SO I bought the fireplace and about 2 minutes after my sister in law called to say they didn't want it as it doesn't really go with their stuff, which is true.. its VERY modern looking, but for our basement it will be perfect.


Enough with this blabbering story... This is our new fireplace that we scored for a whooping $200. Yes that is correct!!! I would like to note that it is about 4 feet tall and about 5 feet wide... so its a big fireplace!! (This is a picture of it at the warehouse... I haven't gotten a picture of it in the basement yet as there is sooooo much furniture all over the place in the basement because of the renovations... but take my word for it, it looks AMAZING in the basement)

It is in mint condition, the only thing it is missing is the remote BUT the on/off switch is right on the front so it isn't a big deal. I LOVE IT!!

Now just to make this story better... I did this all without consulting Ryan... oops! I was SOOO afraid all afternoon that he was going to be so mad and make me sell it (can't return it obviously). When I got home I showed him my purchase and sneakily asked him how much he thought the fireplace was at full price and how much he would have paid for the fireplace... both of his responses were WAY more than what #1 I paid for or #2 I would EVER pay for it. SO I happily informed him I only spent $200 on it and he was shocked and SO happy!! heehee!! I was sneaky, I knew if I had told him I had spent $200 right away he would have been upset that I bought something we totally don't need just because it was on sale... :-) We didn't get it set up until later on Saturday but he LOVES how it looks downstairs and so do I!!! I can't wait till the basement bathroom is done so I can work on cleaning up that basement so we can ACTUALLY use it!!!

Thursday, November 18, 2010

The End of the Wall Decals

I FINALLY got around to finishing up the wall decals in the nursery. If you remember here I had spacing issues when I put up my original wall decals. Well those spacing issues got worse when I realized I had to move the change table about 4 inches to the left in order to be able to access the drawers on the right side without the door hitting the radiator box. This left 2 small openings for animals. Now I hummed and hawed over which animals to do and I REALLY wanted to do a hippo (like Kim suggested) BUT I discovered I didn't have enough room between the monkey and the elephant or on the left of the monkey. So I put the project aside and thought some more. Then last weekend I came across my original templates for the decals in the tree (bird and gecko) and thought hmm that would work!!! So I pulled out my fabric remnants and went to work! I love the outcome!!!! Go here to see how I made these decals.


I love that the monkey is feeding the bird... Ryan's favourite after work thing to do is to take a walk down to the lake and feed the ducks. Hopefully the blueberry will love to feed the ducks and swans as well!!!

I'm hoping to get this nursery 100% finished by the end of next weekend!!! All that is left is the pain in the butt radiator box...Stay tuned for the big makeover reveal!

Monday, November 15, 2010

The Light at the End of a LONG Tunnel

This weekend I started to be able to see the light at the end of the dark basement bathroom tunnel... literally. Dave and Ryan worked all day Saturday getting the drywall and concrete board up so that Dave could hook up the pot lights so they wouldn't have to use a spot light anymore!!! Its such a HUGE change to be able to have lights in there without hooking up an extension cord to a lamp!! This was probably more exciting to me than the drywall!!!
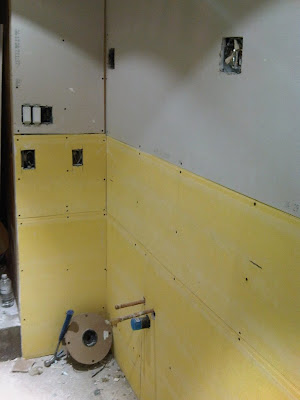
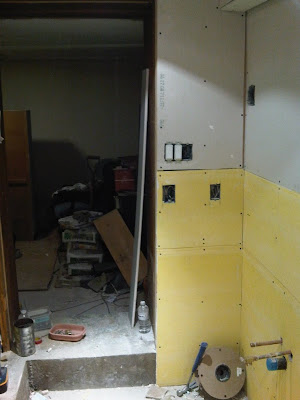
This is the progress they made on Saturday! (the yellow board is the concrete board and the tile will go up the walls that far, and the other is the drywall, the entire shower is done in concrete board as well)
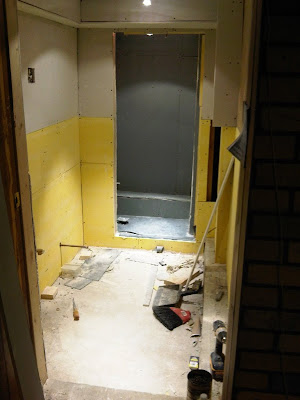
The wall that the vanity and toilet will go on.

The shower with its own pot light.

The small slit on in the yellow board is where a grate is going to go so the radiator heats up the bathroom. And above that, the hole is the last remaining piece of drywall that needs to be done... but at this point the guys were tired and dinner was ready to eat!

This is looking from the shower to the other end of the bathroom. See we have 2 light switches, the first is for the lights in the toilet/sink area and the second is for the light in the shower. There will be a third switch for the heated flooring as well. Below that the holes there are #1 for an outlet in the bathroom and #2 I believe is for the thermostat for the heated flooring. Then on the wall to the right is where the 2 vanity lights will go with a mirror in between.
And this is the doorway and eventually we will have some type of door... I'm still hoping for this type that I mentioned in a previous post. But Ryan wants to use the door we already have... so I may incorporate the door we have into that type of a design...
This is a huge improvement on the muddy hole this was about a month ago... alas now its a dusty nightmare!!! But when dealing with drywall its always going to be super dusty!! At least we have radiators so the dust is contained in the basement!!!
Friday, November 12, 2010

Updating The Waterfront!

My parents have a cottage up north that during the summer they basically live there. Ryan and I spend as much time as possible up there because its so relaxing and fun!! My parents decided to update the waterfront at the cottage to prepare for their future grandchildren (well I think this was also something they wanted to do anyway but the design definitely was so they could watch their grandchildren play in the water from the shore and not have to sit on the dock).

This is what the waterfront looked like before the work was done. (The dock is out of the water but would have been off the bottom concrete step)


And this is the new gorgeous stone waterfront!!! The whole point is so they can put chairs on the second platform area to watch what is going on by the lake.


I believe this is a sand box for the kids.. BUT I could be wrong and it could be a garden for plants... I don't remember anymore.. either way its going to look GREAT!!!!!


My mom admiring the work!


Doesn't it look fabulous!!!! I can't wait till the summer when I will be living up there with the blueberry for most of the summer since I will be on maternity leave.