Saturday, January 28, 2012

Adventures (or Disasters?) in Reupholstery

I am taking on a new and exciting project. As stated in my bedroom post here I want to put a chair in the corner of our bedroom for reading.  This chair I have had sitting around collecting dust for the past 3 plus years.  I always wanted to have it reupholstered but since I never had a place for it I never did anything about it. Now that I know where it is going I want to reupholster it.  Reupholstery is PRICEY!!! So after reading a bunch of other bloggers who successfully reupholstered chairs and survived to tell their story I thought why not give it a try!  Worst case it doesn't work and I send it off to get it reupholstered by someone who knows what they are doing!  So here is the chair I plan to work with.  

 I don't think it will be too difficult... just time consuming.  The hardest part will be the pleats on the back which I actually plan on not doing after looking at the chair in details. This is what I have discovered. First the cushion on the seat and back of the chair are only being held in place with the fabric. I tried taking the old fabric off of the chair and discovered the cushion isn't in fact a cushion it is just stuffing that has been basically sewn to the chair with the current fabric. That nixed my idea of taking the old fabric off and using it as a template for the new fabric. I'm going to have to do this the hard way from scratch.  The back pleats were sewn with a machine before installing on the chair so the stuffing is sewn right onto the material making it a pain in the arse to take that material off or to actually recreate the pleats.  LUCKILY the material I got would probably look a little funny with the pleats so I am forgoing them altogether! After carefully inspection and draping the fabric on the chair this shouldn't be too difficult just as I already said time consuming. 

Since I have blabbed on about the fabric here she is!! I was originally looking for something bold for the bedroom. I had seen an awesome chair in a magazine (which I kept for a long time just for that chair because I loved the idea of it) unfortunately in the move I can't find the chair or a picture like it online. But to sum it up the chair was white with an awesome fuscia pink and white fun patterned material on it. It was really fun.  So when I went fabric shopping this week I had something like that in mind. But after scouring the store I realized that was the wrong idea because the headboard in our room is the focal point and I didn't want 2 bold statements in the room. Then I came across this beautiful fabric!
 All shiny and purple and perfect for our bedroom! It will tie in with the blues and silver wonderfully!!!!  The trim I found matches perfectly too and it will cover the staples wonderfully!! 

Here is the chair with the fabric draped over it. Now I am in a conflict of do I restain the wood trim (it has a bunch of nicks that need to be fixed) or do I paint the wood trim white?  I always have a hesitation to painting wood. I have to think about it some more. Initially I wanted to just restain it BUT after looking at the photo below with the fabric draped over it I think it would look amazing white....
Decisions decisions... I will update you on what I decide....

Tuesday, January 24, 2012

Butterfly Sanctuary

I finally got around to doing something with Norah's room today.  Its been in shambles since we moved in. I had thrown some butterflies on the walls in random places to hide nail holes but hadn't put much thought into it at all. Over the past month I had found a variety of things that we had that I wanted to hang in her room and today I finally did it.  To recap, Norah's room was already painted blue when we moved in and we decided to leave it blue. Ultimately that room will not always be her room someday down the line she will be moved to the spare room and that room will be for baby #2 (NO I AM NOT PREGNANT I'm just talking down the line in 2 + years... hahahahaa) So we opted to keep it blue. My mom had thrown a shower for a friend and used butterflies as the theme. Since she still had a bunch left over I stole them off of her and hung them in Norah's room along with a bunch of tropical/flower pictures.  Here is Norah's room now.  I would like to note it is no where close to as cool as her old room in the other house BUT I think she likes it anyway.

This is the view from the door.  Her change table is on the right side (see what I did to it here). In her desk/dresser we still have all of her diapers and some clothes. SHE NOW HAS A CLOSET so we have so much more room for clothes its fantastic!!!
Above her crib I hung butterflies using 3M double sided sticky tape. The picture to the left is one my brother and sister-in-law took when in Honduras and had framed for Norah. Its a picture of butterfly eggs... very appropriate for the room!! Yes I am aware that I need to fix the crib skirt... I need to make a new one but I'll get to that soon enough!

Above the change table is a tropical beach picture we picked up in the Dominican. Ryan and I love the picture, I just temporarily mounted it in an ikea frame we had lying around. Eventually I would like to wrap it since it is actually a canvas. But for now it looks just fine.


 The rocking chair is still being used (for those impromptu nights when Norah wakes up screaming!!) Above it I hung a quilt my sister-in-law made for Norah.  I LOVE IT!!! 

 It is the alphabet for girls. My favourite is S for Shoes!!! haahaaa!!
 Next to the rocking chair is the closet (which I have to do a little more organizing before showing pictures... lets just say there are a fair amount of boxes piled in there).  The scoll that is hanging next to the closet was a gift from a friend of mine who brought it back from China. It is cherry blossoms and it fits in perfectly with the room. I even hung an extra butterfly above it to tie it in even more.
 My favourite part of the entire room is the super adorable white chandelier that came with the house!!!  Every little girl needs a chandelier!!!
 That is Norah's room in a nutshell for now. I'm sure over the coming year things will change up but for now I'm happy with it!!  I'm off working on another Norah project today! Hopefully I will have it done tomorrow! :-)

Thursday, January 19, 2012

Big Shiny and Beautiful

Today I ran to Home Depot and picked up some baseboards to use as trim for the headboard. About 5 minutes and $20 later I was home with 3 pieces of baseboard and a big smile.  Ryan happened to be home so he actually cut the baseboards (he ruined my fun!! I wanted to do it but while I wasn't looking he did it!) It took us awhile to find the nail gun... we still haven't finished unpacking everything.  And a few nails later the baseboards were in place and looking fabulous! I still have to caulk the seams and paint it but it looks fantastic!!! Its all shiny and pretty!!!!

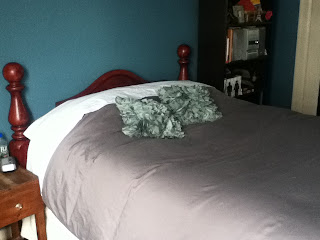
 While upstairs finishing up the headboard we got motivated and actually put the bed on the frame and cleaned things up a bit in what up till now had been a VERY chaotic bedroom.  
 Now the bedroom is by no means anywhere close to complete but its taking shape!  I got 2 side tables that used to be my grandparents that we have put on either side of the bed. Not sure if I'll keep these here or eventually get something a little different but for now they work.

This is the far side of the bedroom.  Its looking a little sparse. We need to figure out what to put on the walls etc.  I may actually move the dresser further to the left and put a small chair in the corner for reading.  Still playing around with the idea.

 On the other side of the bedroom we have our 'his and hers' closets.  LOVE actually having a proper closet!!!! 

Sorry for the grainy photos, I had some lighting issues and was too lazy to retake all of the photos!!!

For DIY details please go here

Linked to the following blogs 

Monday, January 16, 2012

Bed Glorious Bed

Over the weekend Ryan threw the bed on the trailer and drove it up to lovely Kelita's place to set up.  It looks FANTASTIC!!!!!! I had Kelita send me pics because I couldn't be there to see it in person (Norah was napping).  We did a fantastic job! It looks just amazing in her room!


Today I am busy attempting to organize the disaster that has become our basement! Only 2 weeks until I head back to work and I have a lot to do around here! AHHH!!

Friday, January 13, 2012

DIY Wallpaper Headboard

I was looking for headboard ideas and came across this wonderful headboard that I loved!!!!  So I decided this was what I wanted to do in our bedroom in the new house. 


I headed off to Home Depot a few days ago and found the perfect wallpaper!! All silver and shiny I fell in love!  So today I decided to attempt step #1 and install the wallpaper. First I measured the wall and figured out what was center and how big it had to be and penciled it on the wall. Then it was time to cut the wallpaper and make sure the pattern matched.  After cutting the first piece I discovered the pattern doesn't quite match up on the roll... ARGH!!!!  Its ever so slightly off... but since I'd already cut the roll I couldn't return it so I decided to see how bad it was. Not bad at all actually... unless you look super closely you can't even tell.  So I did 3 pieces across, it took about an hour and a half and this is what I have!

 I LOVE IT!!!!  The photos don't show it but the walls are a bluish grey so the silver really pops out!

Now we just have to frame it with some white trim and it will be done!! (we also need to get a bed frame! haahaa) Soon!!

Thursday, January 5, 2012

1 Bed, 2 Girls, 4 Posts Continued

Well today Kelita and I tackled the bed again!!  We figured we had about 3 plus hours of work ahead of us and were both secretly dreading the whole thing this morning.  Weren't we pleasantly surprised when an hour and a half later we walked out of the basement basically finished the bed!!!!!  Can I hear a YAHOOOO!!!

Starting this morning we still had to sand down the headboard and then put the first coat of stain on it. Then steel wool down the side rails and the foot board that we had previously stained and then do a second coat of stain on them.  Based on how long it took us last time we thought this was going to be an all day event. BUT we apparently have improved on our processes because we flew through it!  You live you learn!! Well we certainly learned!! One thing we both learned was this time we were opening more windows/doors to vent the fumes outside so the house wouldn't be so stinky!!  Haahaa!  Anyway on to the pictures.

Here is the foot board all finished. It has 2 coats of Minwax 2 in 1 (stain and polyurethane).  I love this stuff, its super easy to use! You can brush it on and just leave it, no messy wiping it down and you don't have to add polyurethane after.  Its a lot less glossy too and that's why I love it so much! After the second coat it really darkened up.  You can see in the background the headboard with its first coat on, big difference in colour!

And here is the headboard with the first coat of stain. It was still very wet so you can see the brush strokes but those disappear as it dries.

Anyway all that's left to do is steel wool down the headboard and stain a second coat which should take about 40 minutes. I plan on tackling this next week.  I promise to post photos once its set up at Kelitas!!  It looks soo amazing!!!  HIGH FIVE KELITA we are awesome!!!

Tuesday, January 3, 2012

1 Bed, 2 Girls and 4 Posts

First off... get your mind out of the gutter!!! Today my good friend Kelita and I tackled staining a bed!!  This bed used to be Ryan and mine BUT we have decided to go a different route for the new house SO Kelita is taking the bed from us.  She wanted a dark bed SO we're staining it!!!  We managed to sand down and do the first coat of stain on the foot board and both side rails before calling it quits today.

Here is a lovely during photo of the bed. The before photo I took of the headboard isn't cooperating right now but I'll load that photo later. So this is the colour the bed was previously as Kelita wiped it down.

The side rails took us no time at all to sand down (by hand because the power sander was giving us serious grief today!).  BUT the footboard was a different story!!  All I can say was the words "friggin stupid balls" was uttered more than once today as we not only sanded them down but then had to stain them and avoid drips!!!  BUT after only 3 hours (wow it felt like a LOT longer) we had managed to finish the side rails and the foot board.  LOVE the colour!!


Now we just have to sand the headboard and do the first stain coat on it. And then do a second coat on the footboard and the side rails. BUT its coming along wonderfully!!!