Thursday, July 29, 2010

Look What Dad Made!

This is the second edition of LOOK WHAT DAD MADE!!! My dad made this coffee table a month or more ago but my brother wanted to stain it with the help of my dad so it wasn't finished until last night.
The story goes like this:
My older brother and my sister in law had as a coffee table 2 Ikea Lack tables in peacock blue. They loved the bright blue colour of the table BUT alas Ikea tables aren't made to last. Their tables are similar to this picture before BUT in bright blue... apparently Ikea doesn't sell them anymore in bright blue because I can't find it on the website right now.

They wanted something similar to what they had (but instead of having 2 small tables together, just have one big table) but they wanted it made of real wood (not Ikea particle board). In came super dad to the rescue. Now this project was a little tricky for him because he had to find a way to make the table sturdy and not wobbly. But he figured it out.

The next challenge was finding a peacock blue stain in the right tone. I know they looked at the Minwax stains but they weren't the right colour. I believe they ended up going to Lee Valley (my dads new favourite store) and getting a blue stain there. I could be wrong about that fact though. Anyway, this is the end result! Doesn't it look awesome!!!! Ignore the dark spot on the table... after some initial fears that something had gone wrong with the stain they realized it was the shadow from the light hitting the table!! :-)

So there you have it, a wonderful bright blue coffee table!!! Isn't my dad great!!! Stay tuned for more 'Look What Dad Made'. We are going to tackle shelves for the nursery tree soon!!! I believe he has also been commissioned to build a porch swing for my younger brother and sister in law!

Wednesday, July 28, 2010

Rock-A-Bye Baby

I have been trying to get some things done around the house this week before I set off on my 2 weeks of vacation up at the cottage. Mind you I plan on bringing a bunch of projects with me and since Ryan will be home I can always get him to bring things up when he comes to visit... BUT there were still a few things I wanted to check off my LONG list this week.

Covering the cushions to my 'new' (well new to me) glider chair for the nursery was one of them. I purchased this lovely glider chair off Craigslist months ago for a $30!! Yes that is correct... I spent $30!!

Now it did come with cushions but for some reason I can't find my picture with the cushions still in tact. I bought this off someone down the street from us who lived in a basement apartment. The chair was in perfect condition except the cushions had that musty basement smell. Which is fine because I planned on throwing the cushions in the wash regardless just to get anything funky off that may have been left by previous owners. The material that was on the cushions was a bland brown... and when it came out of the washing machine it had SHRUNK so much the cushions were curled and misshapen! SO I cut off the old material and left it as it was. On our trip to Fabricland on Sunday I came across the PERFECT fabric... now normally I would have passed it over because of the price but since I only needed a little less than 2 metres I had to grab it. At $13/metre it wasn't too pricey.. just more than I normally spend. Here is the material I used (sorry the light was not cooperating last night). It is a lovely green, blue and yellow striped material.

I got to work last night sewing my new cushion covers. My cousin suggested to me that we may want cushioning on the arms of the glider so I purchased some $2 round pillow foams and crafted some arm cushions from them. I was hoping I could just Velcro the cushions on to the chair... as you can see from the picture below the Velcro didn't hold too well. The new plan is to get big buttons and sew the cushions around the arm and hold it in place on both sides with a big blue or green button. Which means I'm OFF to FABRICLAND again!! Actually I'm heading there tonight anyway to help my friend find fabric for curtains! Enough of my blabbing. This is how my wonderful chair looks now (ignore the one arm.. the Velcro came undone JUST as I was taking the picture)

That is exactly where the chair will go too. Ignore the furniture around the chair. The dark brown dresser will be gone as of next weekend and since it is taking up so much space its very tight in there right now!! This way when I'm feeding or coaxing the little blueberry back to sleep they can stare up at the awesome tree!!!

I don't know if you noticed but you can see one of the new additions to our tree as well, a small blue gecko on the trunk. Ryan had fun making him!

This whole project cost about $60:

* Chair - $30

* Material - $22 plus tax

* Velcro - $1.69 plus tax

* 2 Pillow cushions - $4 plus tax

Not too shabby if I say so myself since a lot of these chairs retail for over $200 and are sold used on craigslist for about $100. I'll just pat myself on the back for those savings!!!

Monday, July 26, 2010

Leaves Leaves Everywhere!

Well after writing my post yesterday morning Ryan was all excited to head off to Fabricland and pick up material for the leaves. Seeing as it was Sunday and Fabricland doesn't open until noon he had a LOONG wait ahead of him. So we popped in a movie and relaxed. The second it was 10 minutes to noon he hopped up and was ready to go.
Now this was Ryans first trip to Fabricland. I normally go by myself... and I now know the reason. It took about a half hour to get Ryan on the same concept idea as I was with regards to colour. I believe there were MANY leopard and zebra prints that Ryan picked out and wanted on the walls. I also had to teach him about which fabrics can be ironed on a wall and which will just melt to the wall (ie anything with lycra will melt to you walls unless very careful). We wandered around looking and were probably there for about 45 minutes to an hour. Finally we found 3 lovely materials. Two were for the leaves and the third is going to be PERFECT to recover the wonderful glider chair I purchased off Craigslist... more on that another day. These are the two materials that surprisingly Ryan found (with a little help in the colour tone category from me).

Nice and bright and although they are blue and green they are more or less gender neutral colours. If we have a girl we will add a few pink leaves to the tree as well. If its a boy it will stay the way it is. I should probably add that these two materials were chosen more based on price... they were each only $3 per metre and we only got a half a metre of each... setting us back a whopping $3 plus tax!!! WOOHOO!!!
Other than ironing the double sided webbing to the backside of the fabric I left this project up to Ryan to do. To see how to make material wall decals go here.
Ryan spent Sunday afternoon drawing a leaf pattern and then tracing it onto the 2 materials and cutting them out. I was attempting to nap at this point... but when you live with Ryan that doesn't actually happen very often!!! After dinner after Ryan had cut out all of the leaves he instantly wanted to iron them on the wall but didn't know how to do it. So together we pulled out the iron and got to work. We quickly found that the green and blue material was very thin and when you put the iron directly on the leaves the iron would be covered in the glue from the webbing. SO out came a tea towel and we just ironed the tea towel over top of the leaf which worked perfectly every time. (I should add that we were both still in our PJ's... ignore my half awake look in these pictures haahaa)
Ryan very enthusiastically ironing the leaves on the wall!!! I know you can't see it but his mouth is wide open... as it always is when he is concentrating!!
AND TAH DAH!!! The end result! We LOVE IT!!!! We decided to put a few of the extra leaves we had floating down from the tree. The best part about it is if in the future we decide to change the colour scheme those leaves are completely removable and we can always add new colours!! We are both VERY pleased with how it turned out!!!!

I will have a lot more projects this week and in the weeks to come. Including my kitchen cabinet project that will finally happen next week while I'm on vacation!!!!! YEAH!!!!!

Sunday, July 25, 2010

Nature's Nursery

Surprise!! The secret is out... Ryan and I are expecting our first child! We are VERY excited for the little blueberry to arrive... waiting (or patience) isn't one of our better qualities... haahaa!! Remember awhile back when my mom came over to repaint what used to be our walk in closet and I stated that it was to be my new craft room (if you don't remember you can go here)... well I lied. It is actually being transformed into the nursery. This way we don't compromise our spare room and the little 3rd bedroom is perfect for a nursery!!! I have actually managed to find away to get the crib, a glider chair, a dresser AND the change table in there. Speaking of the change table, remember when I repainted my makeup table and lined the drawers with fun paper (here) well that lovely makeup table is to be the new change table!


The plan with this lovely piece is to pick up a change pad that has the snaps on it so I can snap it to the back of this dresser. It will work perfectly. Its what my mom used as a change table with my 2 brothers and I. Plus it has lots of drawers to keep diapers and such!


Well the general theme of the nursery is going to be animals and nature. I had decided that I wanted to have a large tree in the corner of the room where the glider chair was going to go so that the little blueberry would have something fun to stare at. As I always do before any project, I googled 'tree mural' images and found this lovely tutorial. And they had the perfect tree outline!!!


Basically you are supposed to get a projector and project this image onto the wall and trace it. WELL I didn't have access to a projector and I THOUGHT I couldn't draw. BUT on a Monday after work... after I'd already bought the paint for it I got very excited. I pulled out my trusty HB2 pencil, pulled up the tree outline image, put my laptop right next to me and went for it. I have to say I was VERY SURPRISED with myself!!! I can't even draw a stick person well but for some reason I was able to duplicate this tree!!! It only took about 20 minutes to lightly draw it on the wall.


Being so excited about it, I believe it was the very next day that I decided to paint the tree. I bought the same CIL satin finish paint as the walls just in a brown (I don't even remember the colour because I was so excited I didn't keep the paint chip...). I pulled out a half inch paint brush and went to work.


In the end this is what was left! I was rather surprised with myself and my ability to draw/paint!! Mind you I had to keep reminding myself that trees aren't perfect! It was quite easy and super fun to do!!!


NOW you may be thinking it looks a little bit like a scary tree... believe me when I was done I was like AHHHHH the baby is going to be scared to be in this room. BUT I knew that wouldn't be that way for long.


This is the plan for the tree.

#1 - We plan on continuing the advice from the tree mural tutorial and making fabric (not wallpaper as the tutorial suggests) leaf wall decals (to see how I made my wall decals go here) Which will transform the tree into something like this.

Once we know the sex of the blueberry we will be making leaves for the tree in a variety of colours. Ie. if its a boy there will be lots of greens and blue leaves (we aren't going for colour accuracy here) and if its a girl we plan on making green and pink and purple leaves and possibly some blossoms as well. Mind you Ryan wants to go to Fabricland today to find material for the leaves... SO this may change....


We also plan on making animal silhouette wall decals all around the room. There will be a monkey (or 2) in the tree or possibly hanging over the crib. Definitely a giraffe... I may possibly put it in the corner by the door and transform the giraffe into a height chart. Some elephants. All of this is to tie in with our lovely quilt that we bought at an auction which will be hanging on the wall above the crib (securely fastened). I will show those pictures later


#2 That owl hole. Ryan has a project to do... he is going to make some type of a curved shelf to go in the corner under the owl hole. Then my friend Katelyn is going to crochet us an Amigurumi owl to go in the owl hole. Here is one she crocheted for her mom. You can check out her blog here.


#3 - SHELVES!! I found this fantastic picture here that I LOVE! So I have recruited my dad to make us 2 shelves that will look like the tree branches and we can put books and toys etc.


That is the plan so far!! At the moment we have the room painted and the tree painted and that's it. LOTS of projects in the future. Now you know why I've been a little lacking with blog posts... #1 anything I have done I wasn't about to reveal just yet and #2 I haven't really felt up to any projects lately, I would rather lie on the couch and watch TV. :-) BUT that will soon change!!!!

Thursday, July 15, 2010

Big Online Garage Sale

One of my favourite pastimes... and Ryan's for that matter (mind you he is looking up dirt bike and trailer stuff 99% of the time) is to peruse Craigslist for awesome finds!!! Sometimes when I'm wasting time I just like to find the stupidest things on there that I can. If you have never visited Craigslist.. or Kijiji basically it is a super large garage sale!!!! You have a little bit of everything and every type of seller. You have those who just want it gone and you can buy it at a SUPER low price. You have those who want to make money off their oops and charge you JUST under what you would pay for it in the stores. Then you have those scammers who try to sell it for more than what it is currently priced at in stores!! So when shopping on craigslist (or kijiji) you have to know your prices.

I have bought my fair share of craigslist items... as well as listed MANY items on there!! I normally will only buy items that are close to home or work so I don't have to drive across the city after work to pick them up. My theory is that if its cheap but I have to drive a long way it isn't cheap anymore because now I've used my gas and my time. I have bought Ryan presents off craigslist... our theory is why pay full price for something when you can get it for a discount and its slightly used!! Now that theory only holds for certain items.... like I would NEVER buy a used mattress... that's gross!!! (just my opinion) I have sold many items from our house on there, including a couch and a futon, dressers, desks, bookcases. I even gave away my wedding dress to a lucky lady for FREE.

While perusing today I came across this 'lovely' little find and had SUCH a laugh I had to share!!!! Its often I come across items that I'm just like WOW WHAT WERE YOU THINKING BUYING/MAKING THAT!!! Its hilarious! Anyway, here is my NOT SO fab find of the day!!


The ad reads:

IKEA wardrobe covered in unique wallpaper, needs doors, Very special piece, with drawer Measurements of wardrobe 71 inches tall, 23 inches deep, 31 inches wide. Measurements of Facade 77 inches tall, 41 inches wide


Basically someone took an ikea wardrobe and transformed it into a leopard print nightmare!!! I have to give them credit for creativity!!! I also have to say that at least these people know its 'special' as stated in their ad. But SERIOUSLY???


Or this ad... mind you this ad just baffles me... I'll explain in a second:


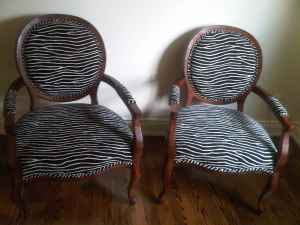
2 ZEBRA PRINT CASUAL CHAIRS (a pair) these are brand new and never used! they are stunning, unique, and sexy black/white pattern such a fun addition to any room Solid wood frame and chenile fabric Asking $1600 (for the pair) OBO Chairs were purchased for $2400/pair


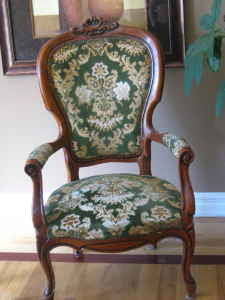
There are many reasons that this ad baffles me... #1... WHO PAYS $2400 for zebra print chairs to never use them and then sell them.... #2 WHO WOULD BUY THESE??? And more importantly #3 why wouldn't you just buy a cheaper chair and reupholster it to your needs. For example the chair below is for sale for $40 on craigslist... you could buy it and then take it and get it reupholstered but WAAAAY less than $800 each!!


I have just never understood the pay two months mortgage for a chair that you will never sit in. I'm not against paying for something that you 100% will use everyday... like our fabulous couch which cost a pretty penny. I tend to shop and shop and shop until I find exactly what I'm looking for in the price range that I think is reasonable. AND I might add I have NEVER not found it!!!! It may take more time but why buy the first one I see when I can look around and get it for half price. SO if you are looking for something let me know and I guarantee I can find it for cheaper!!!

Anyway, that is my price savvy story for the day!!! Just about everything in our house comes with a story about where we found it and how it was such a good deal!! :-)

Sunday, July 11, 2010

One Day.... One Deck

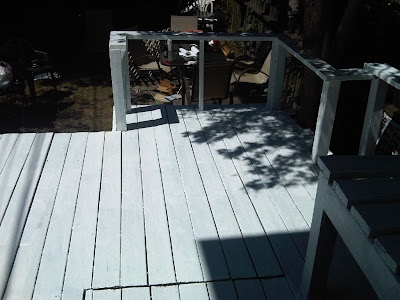
Yesterday while the plumbers were here fixing up our basement bathroom (post to come later) since it was HOT and we knew we would have no water all day we jetted across the city to David and Gina's to help them out. Our friend Dave was helping them out with some electrical problems and Ryan and I had a date with their deck!!! It was a VERY productive day!!! Dave rewired their kitchen so they could maximize on the space... there was an old built in stove that we removed and flipped some cabinets around and the location of the fridge in order to create a fantastic kitchen!!! Ryan and David fixed up the spare bedroom, before they got their new roof they discovered it leaked horribly into the spare bedroom so they had to cut out a piece of the ceiling to get it to dry out. With the new roof on they could drywall up the hole. They did a great job!!! I got to pull out my trusty sander and sand down the deck. This is the same deck a few weeks ago I power washed here. This is what it looked like before.
Not a pretty sight... well I sanded the deck down. Then swept it all off. Earlier we had all gone to Home Depot to pick up a deck primer and paint. Unfortunately since the deck had previously been painted we had to repaint it and we couldn't stain it. We used a Behr porch and deck primer to prime the entire deck. We were hoping to get a coat of the brown deck paint on it too but it was HOT and there wasn't enough time. BUT even with just the primer it looks a LOT better!!!!! Ryan primed the majority of the deck!!! As you can see from the pictures below we got rid of the ugly white plastic lattice. We picked up some wood thinner weaved lattice while out and while we were priming Gina was measuring for the new lattice.
Doesn't it make a HUGE difference??? The plan is to paint the deck itself and the railings a milk chocolate brown. Then the new lattice work will be painted white or a lighter shade of brown. It is going to look fantastic!!!!


That was how our Saturday was spent!!! I will update on the basement bathroom progress soon!!! Its all very exciting!!!

Tuesday, July 6, 2010

LOVE IT TUESDAY: Entrance Storage Benches

As I said in yesterday's post, over the weekend we went to a craft show. I came across this AWESOME idea for an entrance way storage bench/coat rack that I LOVED!!! And IF I actually had an entrance way (rather than coming straight into the living room) I would TOTALLY do this. BUT until we move into a different house it will have to wait for the time be. Anyway because I was hot and irritated on Sunday I didn't take a picture of my fab idea... BUT thanks to the Internet.. I found MANY similar options!!!

Basically the whole idea is this. You find an old door... the Restore has some GREAT doors for cheap. You replace the glass in the door with mirrors. Then you add some hooks on the side for hanging things on. Then you build a storage bench and attach it to the front. And voila.. awesome unique entrance way storage! Plus you have somewhere to keep all of your shoes (if you're like me and have a million pairs!) Personally I think the more character the door has the better!!! Here are a few examples (none as nice as the white one I saw at the craft sale... I should have taken a picture!!)


I really like this door.. BUT I would have put a larger storage bench in front of it instead of the table.


(source:http://www.reusedrelics.com/hall_tree.html)


(source: http://buildingblocksintupelo.wordpress.com/2008/11/24/love-these-doors/)


(source: http://www.coat-rack.net/page/3/)


Anyway, that is my super awesome idea of the day!
On a side note... Ryan and Dave hung the loon picture on the concrete condo wall in our backyard... now I have to admit it now draws your attention to the awful concrete wall.. BUT I have plans to add more around this picture to hide the wall.. PLUS hopefully the vines will grow around the picture.


Monday, July 5, 2010

Fabulous Weekend and Fabulous Finds!

This weekend since I had the Friday off Ryan and I headed to the cottage for a nice relaxing weekend! Which is exactly what we had! We didn't do a whole lot.... I got to read the majority of my super huge book which was great for me because at home I barely ever get to read anymore! Ryan worked with my dad to repair part of the deck up at the cottage that had started to rot out. Since I was reading my book I couldn't be bothered to get up and take pictures of their work... sorry it was a lazy weekend!!

BUT on Saturday mornings during the summer there is a shed sale that goes on and is run by a bunch of old ladies over at the nearby church. Now Saturday was the first sale of the summer so we all got up super early and headed off to be there for when it opened! I'm REALLY happy that we did!! We ended up picking up a fantastic cedar chest for $10!! Yes that is correct it was only $10!!!! Now since Ryan and I were too lazy when we got home yesterday to take it out of my car its still there and alas no photos to show today. I promise to post photos soon though. The best part about the box is that inside some child has used red crayon and written "MEG" WOW it was definitely meant to be my box!!!!! We plan on using it for additional storage in our basement. We have a little house and lots of stuff... you can never have too much storage!!!!

Also during our trip to the sale I picked up 4 old wooden picture frames. I have a project in mind for them as well.. but since they will be Christmas projects you will just have to wait until then for me to transform them into something fabulous!!

Then on Sunday there was a craft sale up the street which we decided to check out before making the hot and sticky trip back home. We ended up picking up this lovely little piece of art!

It is an old screen that the lady had painted with outdoor paint. We loved the idea of this but at first were like where do we put this?? Then the lady informed us that they were designed to be left outdoors!!! Ingenious!!! Instantly Ryan wanted it and since it was only $45 (a steal since the lady had probably put many hours into painting this) we picked it up! In fact my mom picked one up as well that had cardinals painted on it.


The plan for this art piece is to hang it on the condo building wall in our backyard to hide the ugly concrete and bring some of the cottage life home. This is the best picture I can find that shows the concrete wall. There are vines growing on the wall BUT when we went to rescue the evergreen tree from the vines that were killing it some of the vines on part of the wall had to come down. So we were left with this ugly concrete wall. Which normally doesn't bug me too much but Ryan has always wanted to paint the concrete. (also this picture was taken in March or April so the sand pit you see is actually where the pool goes, the boys were taking down the old deck and as you can see I was enjoying my wine!)


The picture will either go on that wall OR we will put it on the hot tub structure. So when you are sitting under the gazebo there is a pretty picture hanging. We have to figure that out this week! Lots to do!! :-)

Projects that I am hoping to get to this week:

* Infamous kitchen light that I have been working on forever....

* Sewing new kitchen curtains

Now since its supposed to be ridiculously hot this week I think I'm going to leave my project list at that.... Because if its stupid hot when I get home from work I'm NOT going to want to do anything other than hopping into the pool!

Thursday, July 1, 2010

Snazzy Whiteboards

Ok so I MAY have been a little busy lately and haven't had a chance to upload my grandma's party photos... BUT she had a blast and so did everyone else so take my word for it!!! I will try to upload photos this weekend. I also have been seriously slacking in the projects department... just not enough time in a day I tell you!!! BUT that will be changing soon!

Anyway, since today is Canada Day and I'm stuck in the office and it is pretty darn empty I thought I would post this awesome DIY that I found this morning while procrastinating! SHHHHHH!!! haahaa!!!


I love whiteboards... I always have.. BUT they are pretty ugly hanging on a wall. I came across this idea while perusing the web and LOVE IT!!! Its a great way to camouflage a whiteboard in the office!! Which we have... we have a big ugly whiteboard in the office with Ryan's illegible handwriting all over it, which is fine.. but the office has french doors to the living room and is also the spare bedroom. Not attractive!! Now enough of my blabbering.... this is the idea! I found this over at Get Your Craft On. Isn't it super cute! She made it herself!!!


(source: Getyourcrafton.blogspot.com)


I have also found a tutorial over at Paper n Stitch which can be viewed here.


Basically you take any picture frame, put your favourite material or paper in the frame and transform the glass into your whiteboard! SO it looks fantastic on the walls even if there is writing all over it!!!

Another idea I have found over at Young House Love is to transform a mirror into a message board. You can find it here.

(Source: younghouselove.com)

Aren't these both great ideas!!! NOW I just have to find some good fun frames!!! Actually this weekend I'm sure I'm going to have some GREAT FAB FINDS to tell you about. This weekend is the start of the weekly shed sale up at the cottage. A church in the area holds it every summer and you can get some fantastic things there for CHEAP!!!! Ryan even got a pair of winter galoshes (the rubber things that go over your dress shoes in the winter) for a whopping 25 cents!!! I'm VERY excited for Saturday morning to roll around!!!

Have a great long weekend (if you do in fact get it as a long weekend and don't have to work tomorrow!).