
Remember WAAY back in January when I announced I was going to attempt to reupholster a chair here. And then again in March when I actually started the project by painting the chair here. WELL I finished my chair on the weekend and am SOOOOOO HAPPY with the results. It was definitely an adventure as I literally have NO idea what I was doing when I started this project!! Now it isn't perfect but I am very proud of myself!!! SO first lets recap what I started with, here is the chair that had been sitting in my basement for way too long collecting dust.

Then I sanded it down, and primed and painted the arms and legs white. Next came the part where the chair sat in my living room because #1 I didn't have a staple gun (yes I know how could I 'Miss Crafty Pants' NOT have a staple gun!!!) and more importantly #2 I have NO IDEA how to move further!!! Well last week I went out and bought a heavy duty staple gun for this and other projects! On the weekend I woke up and decided what am I waiting for lets get this baby done!!
Now I would LOVE to be able to give you details on how I reupholstered this bad girl (yes the chair is feminine!) but I honestly don't know what I did... I did a little of this and that until it looked good. SO here is my best rundown of this project.

Next it was time for the back of the chair. I had NO IDEA how to duplicate the pleats. So first I started off by laying my material over the chair and using a ruler I tucked the fabric into the pleats for the meantime. Next I started stapling the fabric around the back of the chair and cutting off the excess. This was actually easier than the seat of the chair!

Here is the back of the chair (sorry the picture won't turn the right way for some reason!). After I used a large needle and just tacked the pleats in place at the bottom. I didn't need to do anything at the top because of the way I stapled it to the back so just a few stitches in the bottom crevice of the pleat worked well!

My chair was looking impressive! It wasn't perfect ... but I was happy with it thus far! See my slight oops here... I didn't pull the fabric tight enough and it puckered... but its so small it isn't that noticeable. Plus that side of the chair will be against a wall anyway!
+

Then it was time to do the back of the chair. This was the easiest part! I just pulled the material tight against the back and stapled it up the sides and at the top. I knew I could cover the staples with the decorative trim so I didn't mind stapling it at the top.

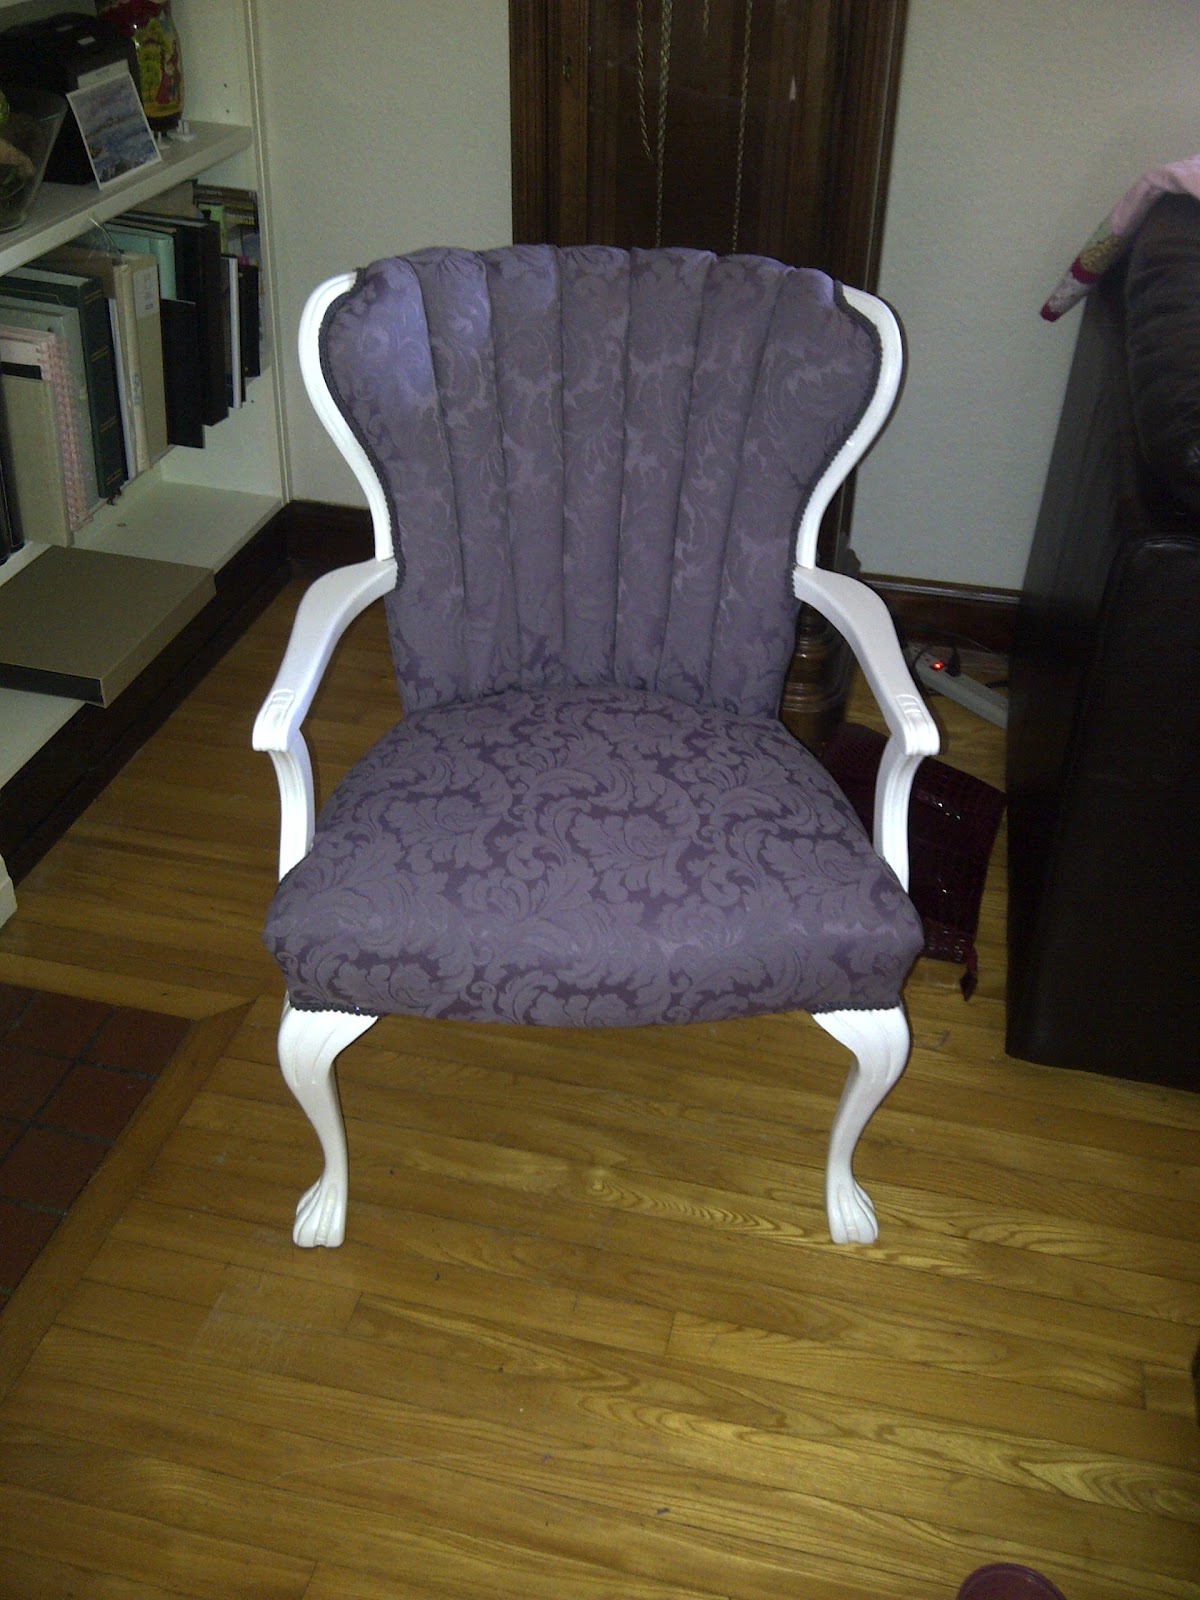
After about an hour and a half I had transformed my chair into THIS!!!!

But I wasn't done yet, you could still see the staples! Next I pulled out the glue gun and glued my trim around the edges covering MOST of the staples. Like I said before this was my first attempt at reupholstering and some of my staples were further in that they should have been... BUT for the most part the staples are covered! I glued under the raw edges to make it look more finished as no one wants to see raw edges!

It was done and I am VERY proud of myself! So to save yourself having to scroll back up.
BEFORE

AFTER!!
Now I just need to clean up our bedroom and make room for this beauty!!!
 Now I just need to clean up our bedroom and make room for this beauty!!!
Nice job! Usually, you have to completely rip everything off a chair (cushions and all) when you reupholster, that's why you most likely had that edging problem. It looks really good though and that trim did the trick!
ReplyDeleteDefinitely love the trim. It matches the fabric so well. And the purple is a vast improvement over the blue. Great job!
Delete